
Song Nhi will help you learn how to track expenses, set budgets, analyze trends, and gain full control of your money. Start your journey towards financial freedom today by using Song Nhi to manage finance.
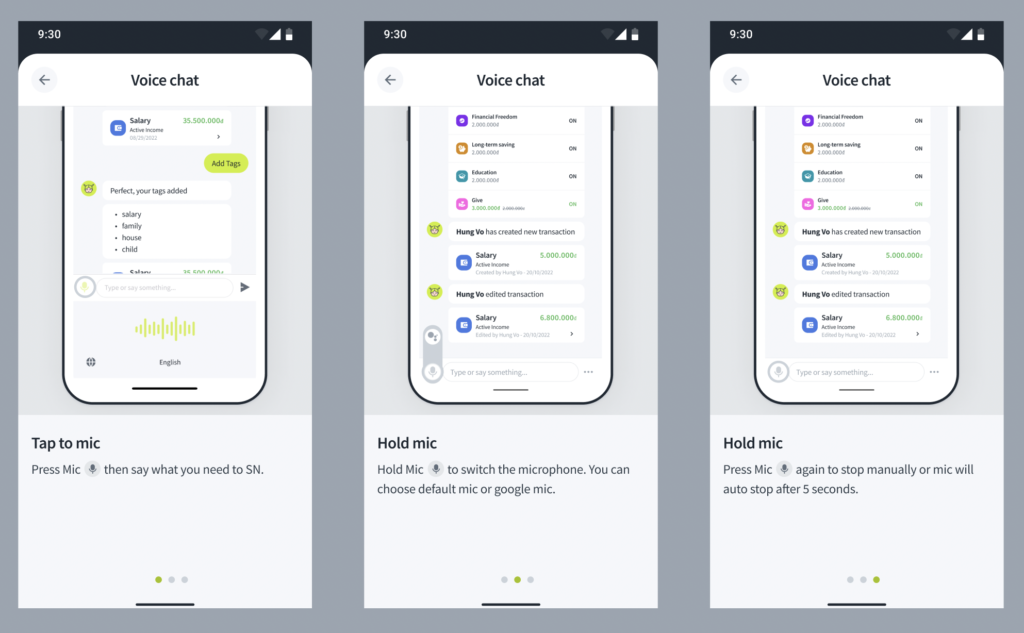
1. Voice chat
Send voice chat to SN instead of chatting
- Tap to mic: Press Mic icon, then say what you need to Song Nhi.
- Hold mic: Hold Mic icon to switch the microphone. You can choose default mic or google mic.
- Stop mic: Press Mic icon again to stop manually or mic will auto stop after 5 seconds
2. View deleted transaction history
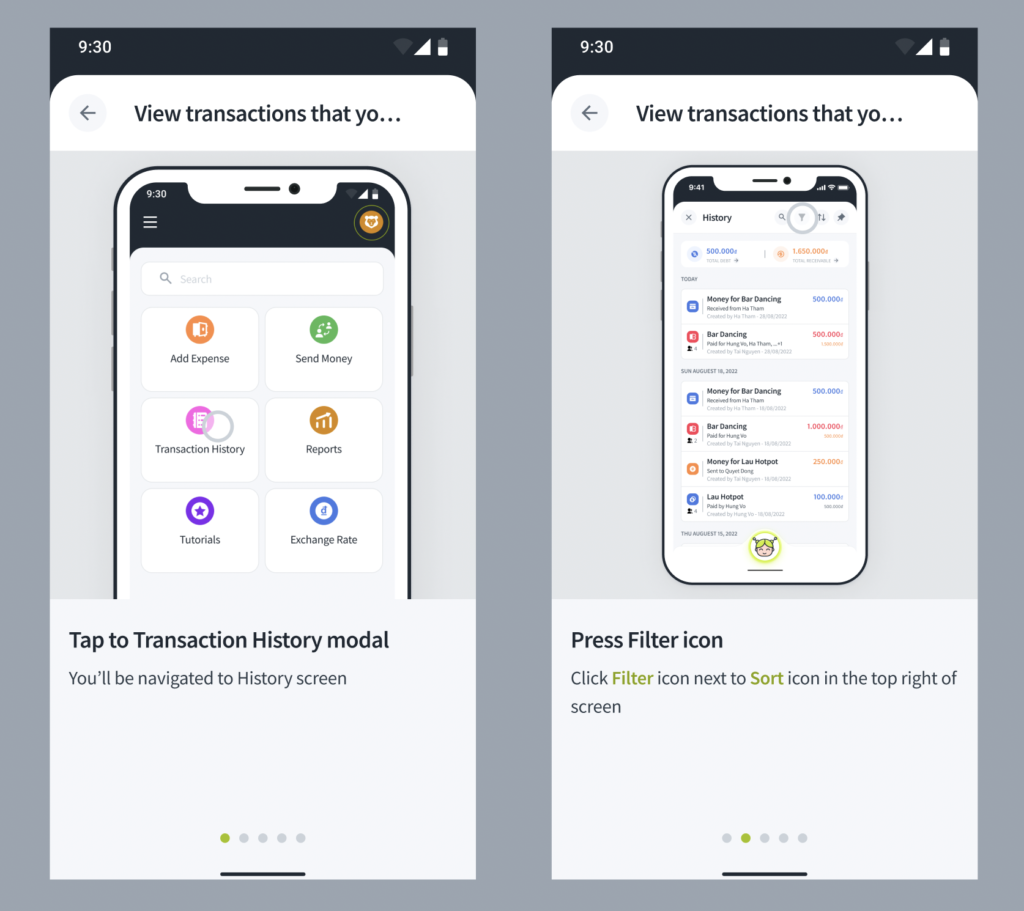
See the transactions you deleted in History List
- Tap to Transaction History modal: You’ll be navigated to History screen
- Press Filter icon: Click Filter icon next to Sort icon in the top right of screen
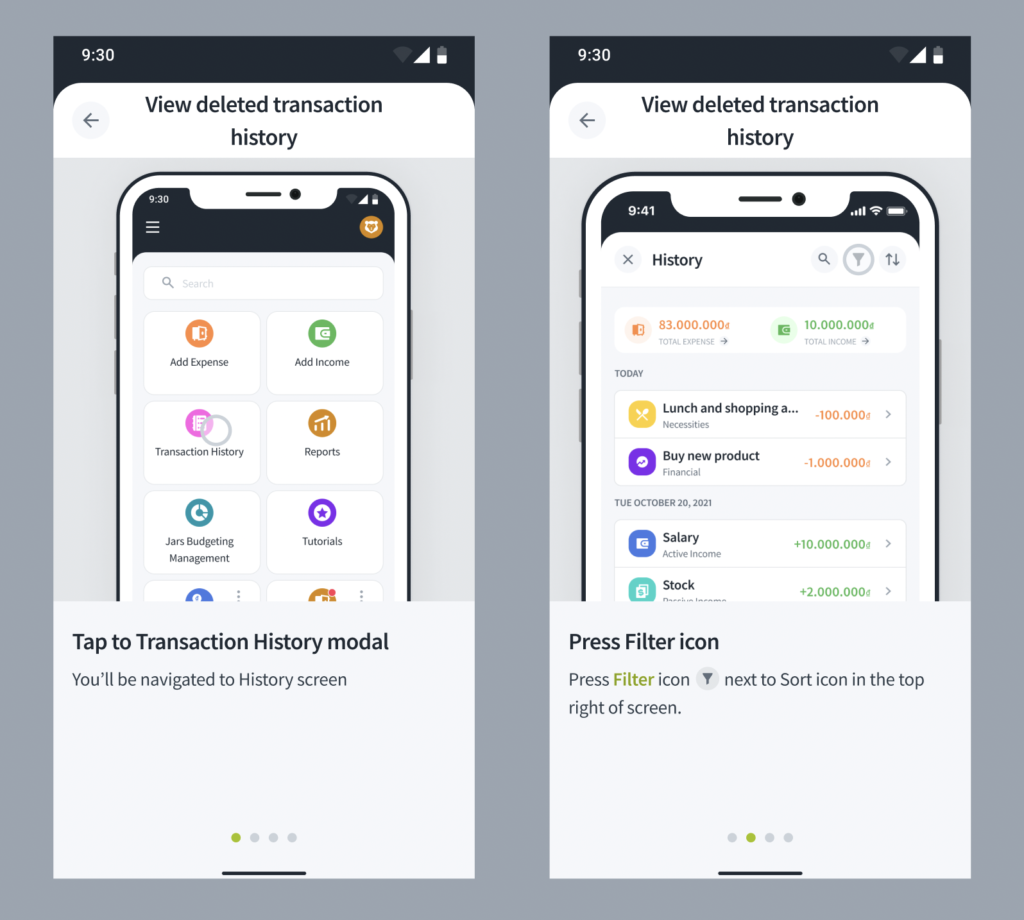
- Show Only Deleted Transactions toggle button: In Filter, press Show Only Deleted Transactions toggle button to switch from OFF to ON. Then press Apply
- Done!
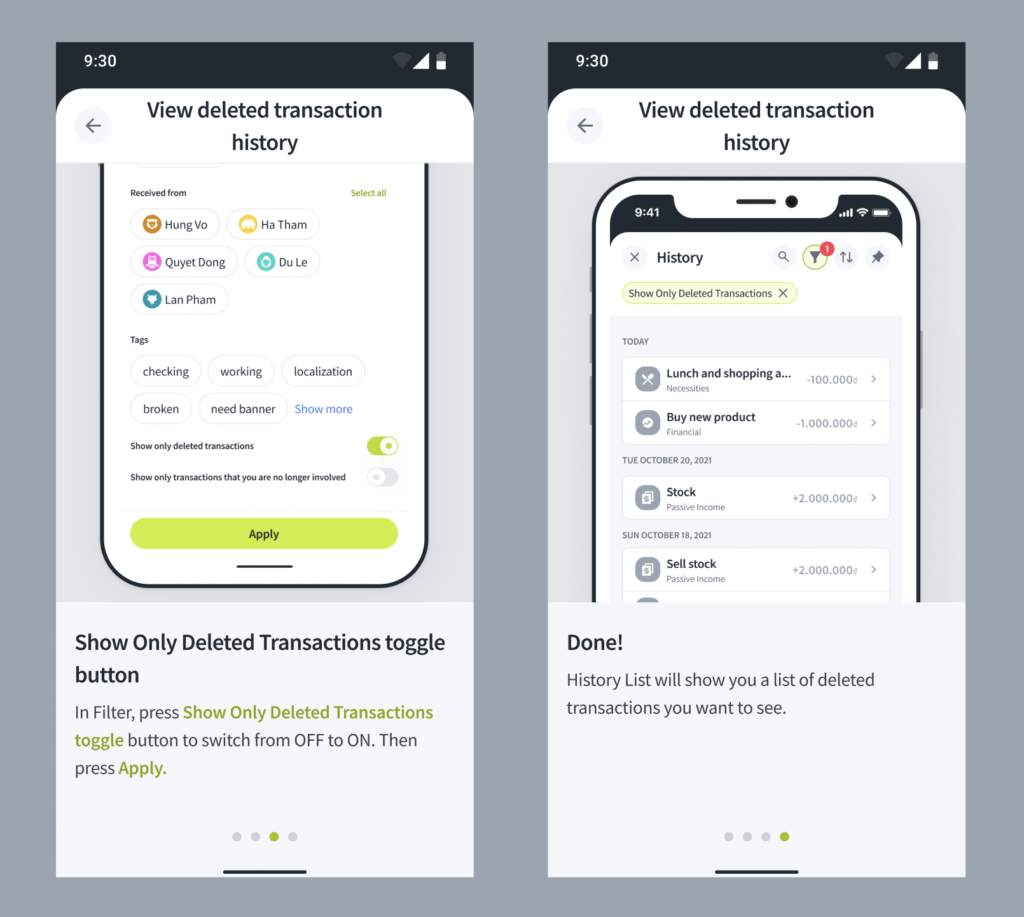
History List will show you a list of deleted transactions you want to see
3. Search transaction
Search for a transaction you want to see in History List with keywords
- Tap to Search icon: In History screen, press Search icon at the top of screen
- Enter keyword in search bar: Type keywords related to the name of transaction you want to search

4. Sort transactions
Adjust the sort order of your transaction list you prefer date/amount, newest to oldest/ oldest to newest
- Tap to Sort icon: In History screen, Press Sort button at the top of the screen
- Select types: Select the sort order of transactions you want to view [Date/Amount, Oldest to newest – Newest to Oldest]. Then press Apply
- Done!
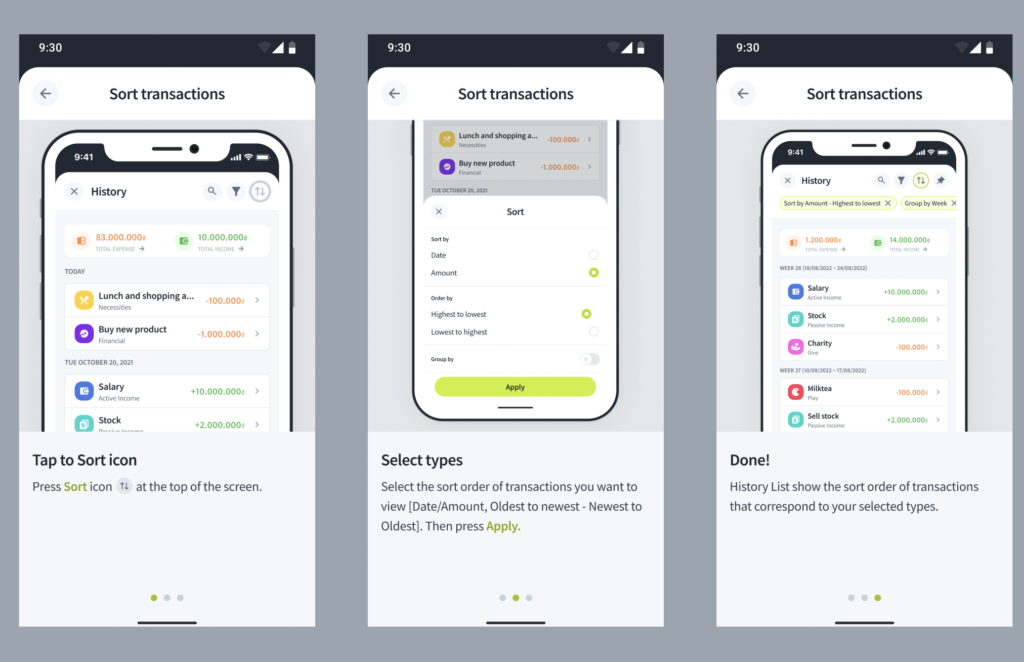
History List show the sort order of transactions that correspond to your selected types
5. Pin Page
Quickly access the pages you visit often by pinning them to Home Menu
- Tap to Pin icon: In Transaction Detail, press Pin icon then you’ll be navigated to the Pin page screen
- Pin page: You can choose the icon and color as you want. Then press Save
- Done!
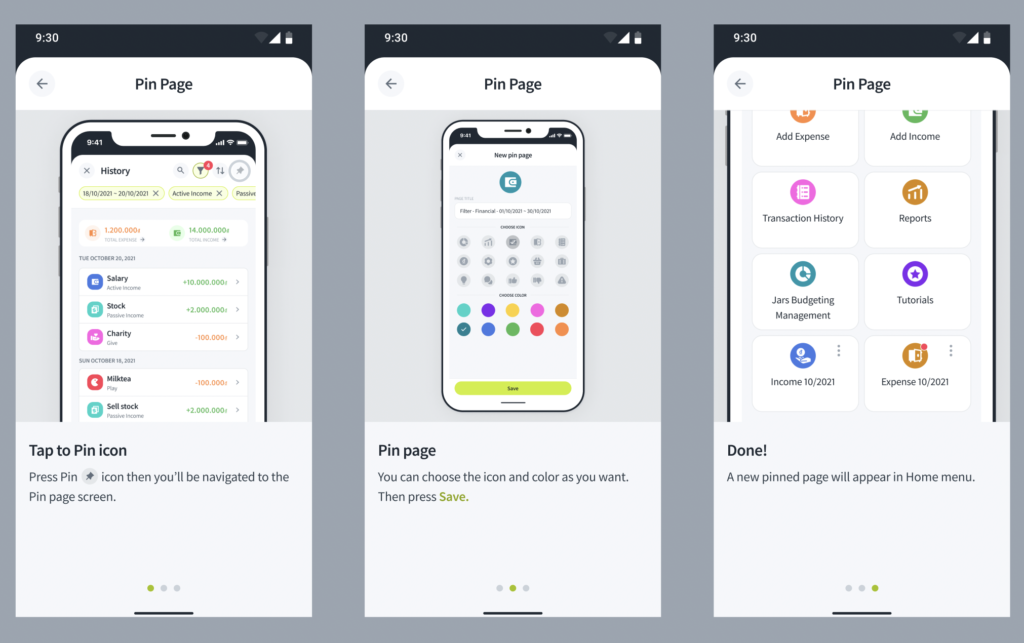
A new pinned page will appear in Home menu.
Personal Profile
Add Income
Adding your earning transactions to manage your finance
- Tap to Add Income modal: You’ll be navigated to the screen to add your earning transactions
- Step 1. Fill in the information: Select currency – date, input amount – note. Then press Next: Select Category button
- Step 2. Select category: Select the transaction category you want [Active/Passive]. Then press Next: Add Tags button. (Or press Back button to go back to previous step)

- Step 3. Add Tags: Select suggest tags or input tags you want to add. Then press Next: Jar Budgeting
- Step 4. Jar Budgeting: Spit and properly adjust your income for each item
- Press Done
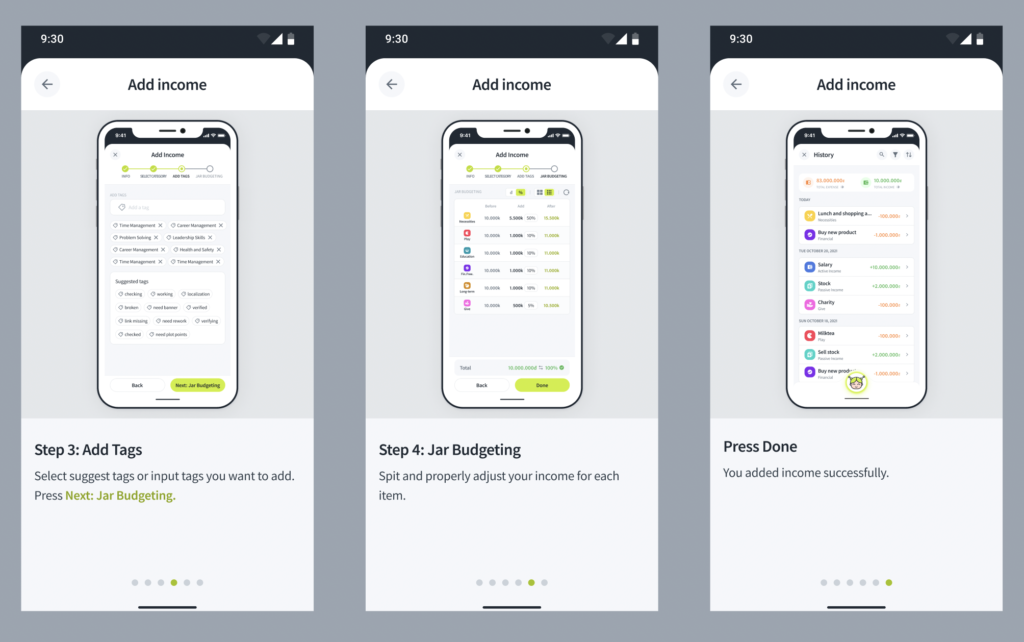
You added income successfully
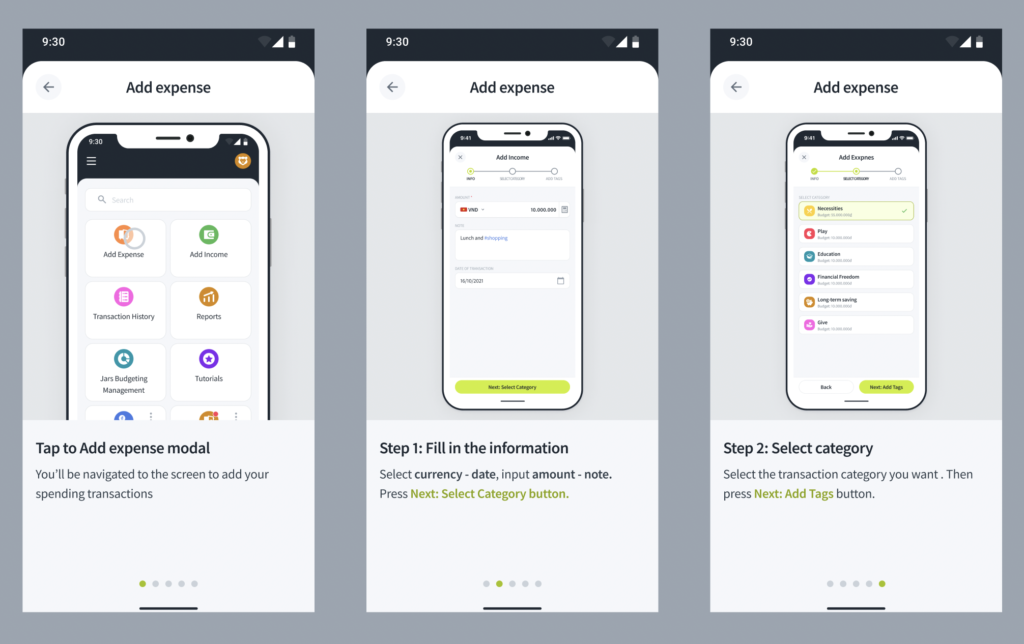
Add expense
Adding your spending transactions to manage your finance
- Tap to Add expense modal: You’ll be navigated to the screen to add your spending transactions
- Step 1. Fill in the information: Select currency – date, input amount – note. Then press Next: Select Category button
- Step 2: Select category: Select the transaction category you want. Then press Next: Add Tags button. (Or press Back button to go back to previous step)
- Step 3: Add Tags: Select suggest tags or input tags you want to add
- Press Done
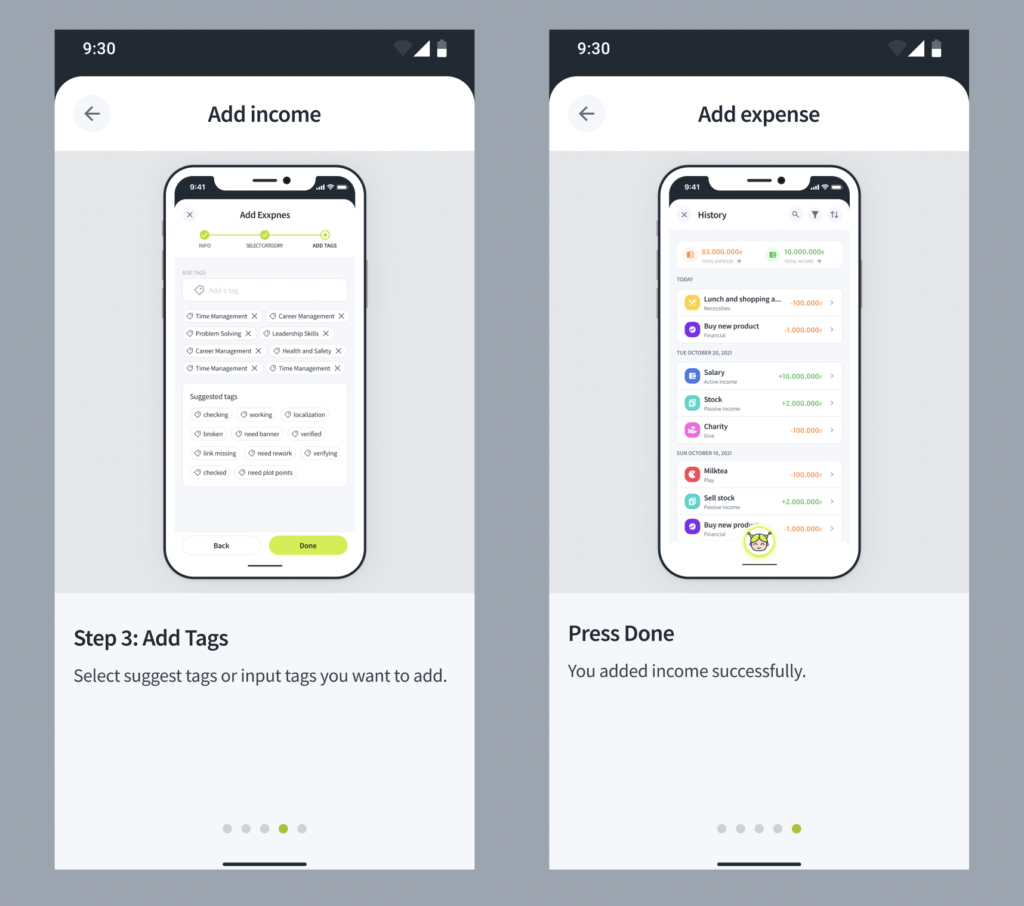
You added expense successfully
Family Profile
1. Add Income
Similar to the Personal Profile Package’s extra income method
2. Add Expense
Similar to the Personal Profile Package’s extra spending method
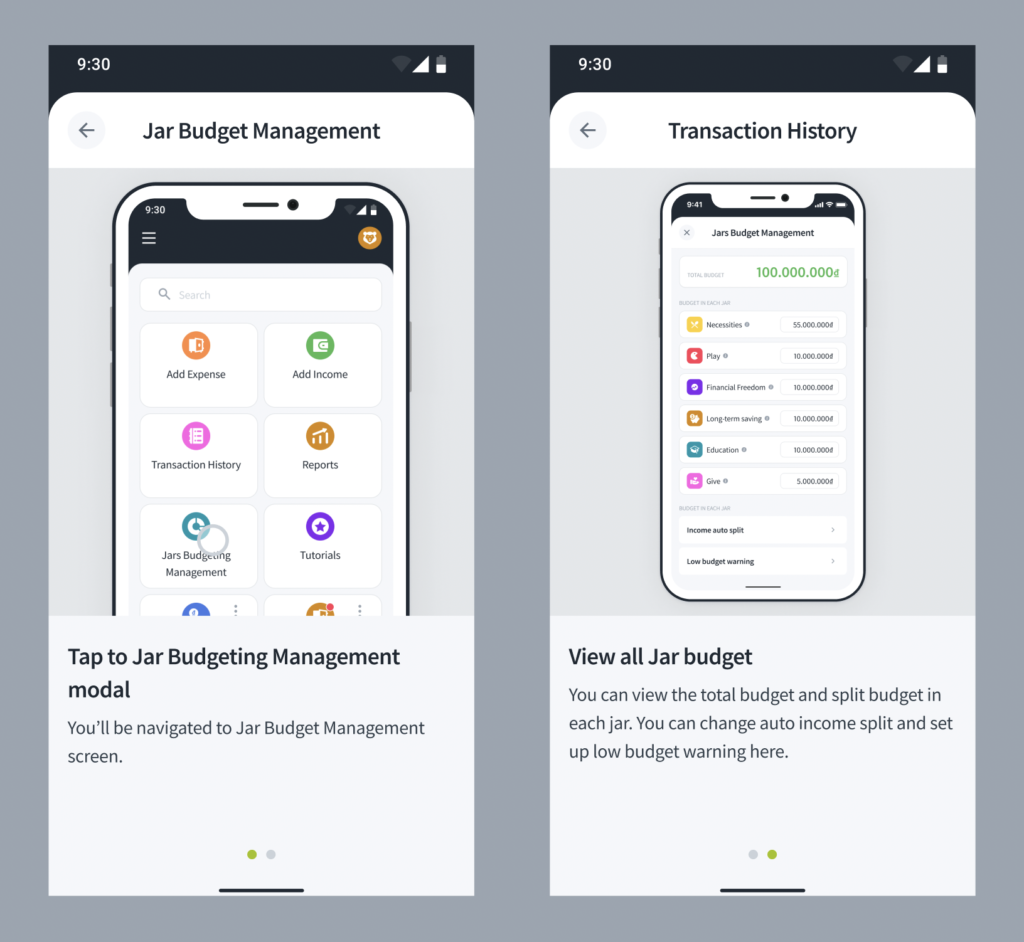
3. Jar Budgeting Management
Utilize the financial allocation feature with the system of 6 jars in the Song Nhi app
- Tap to Jar Budgeting Management modal: You’ll be navigated to Jar Budget Management screen.
- View all Jar budget: You can view the total budget and split budget in each jar. You can change auto income split and set up low budget warning here.
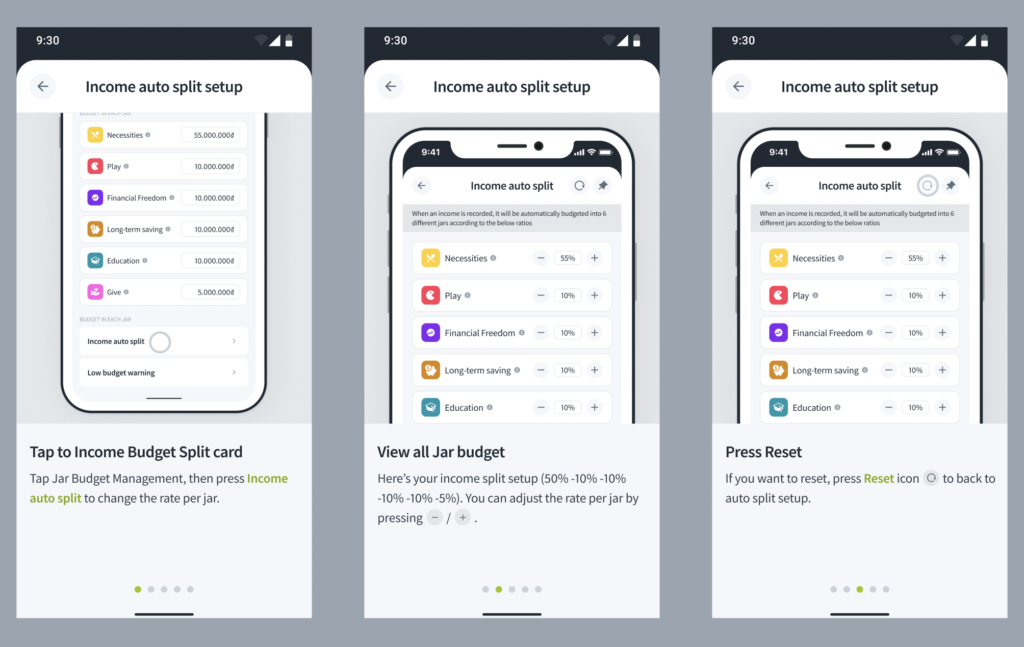
Income auto split setup
- Step 1. Tap to Income Budget Split card: Tap Jar Budget Management, then press Income auto split to change the rate per jar.
- Step 2. View all Jar budget: Here’s your income split setup (55% -10% -10% -10% -10% -5%). You can adjust the rate per jar by pressing (-) / (+)
- Step 3. Press Reset: If you want to reset, press Reset icon back to (↺) auto split setup
- Step 4. Press Set Up: After scaling each jar as you want, press Setup
- Done!
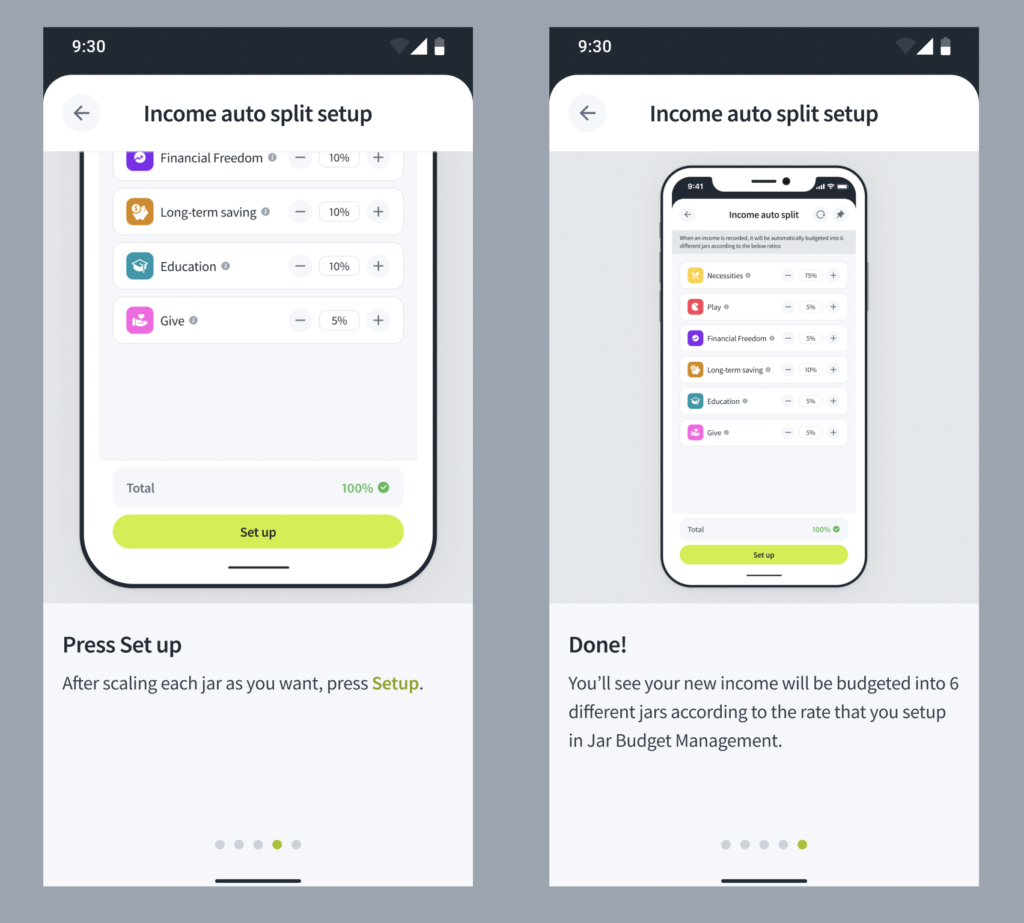
You’ll see your new income will be budgeted into 6 different jars according to the rate that you setup in Jar Budget Management.
Low Budget Warning
- Step 1. Tap to Low budget warning: In Jar Budget Management screen or Notification screen, press Low Budget warning.
- Step 2. Press Remind me toggle button: Turn on “Remind me” for each particular jar you want to get reminder.
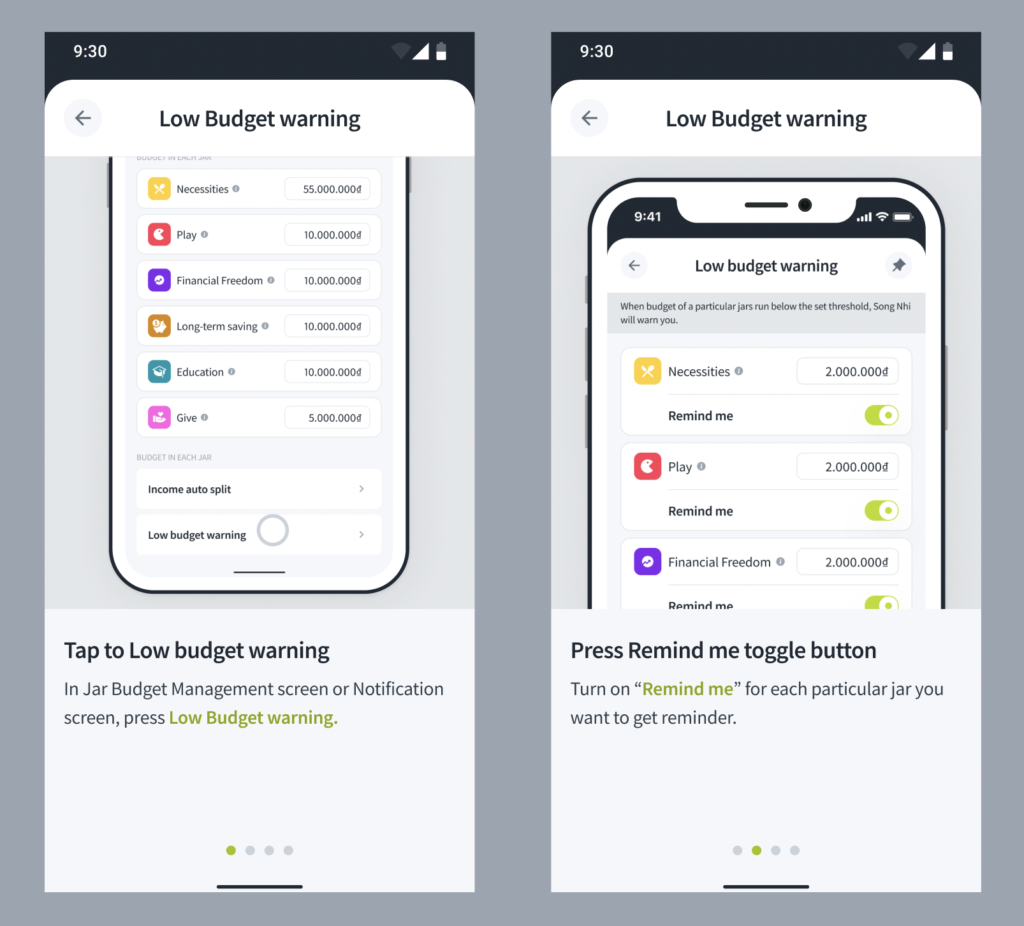
- Step 3. Set threshold: Input amount to be a threshold for each particular jar.
- Press Done!
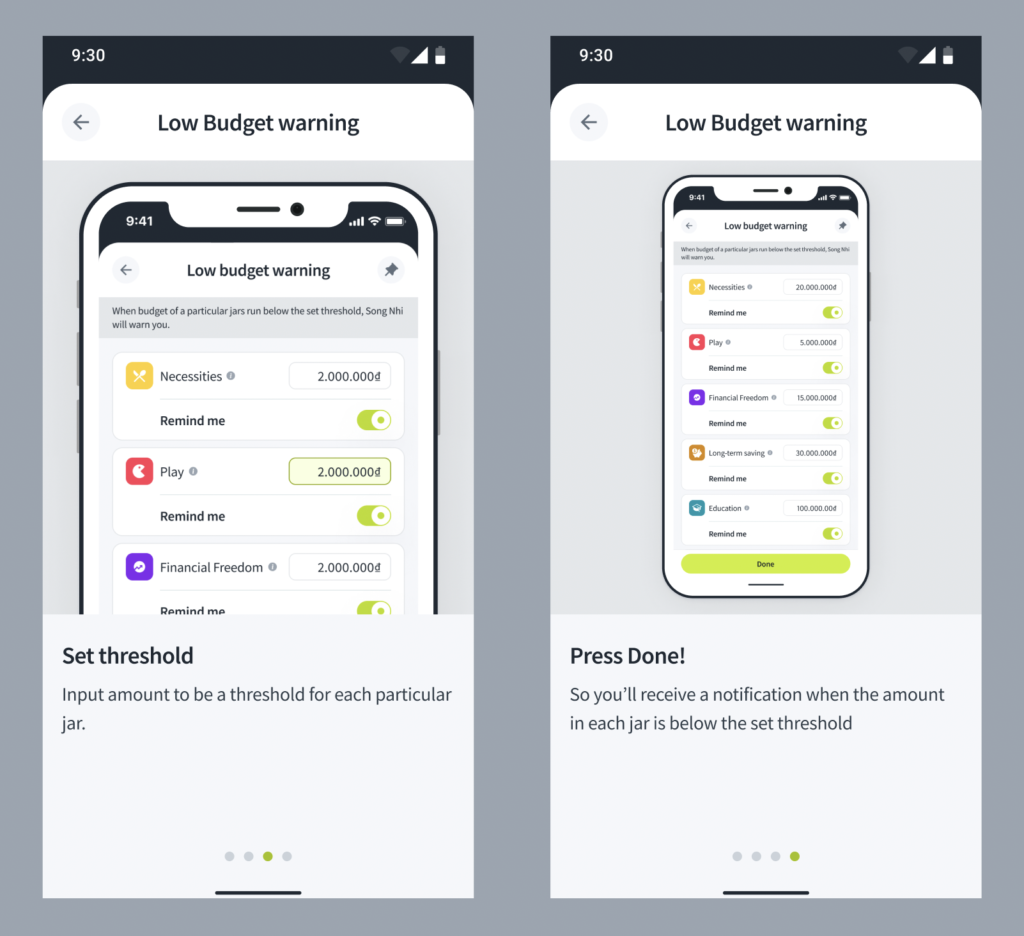
So you’ll receive a notification when the amount in each jar is below the set threshold.
Group Profile:
1. View transactions that you are no longer involved in Group profile
See the transactions history that you are no longer involved in Group Profile
- Tap to Transaction History modal: You’ll be navigated to History screen
- Press Filter icon: Click Filter icon next to Sort icon in the top right of screen
- Show Only transactions that you are no longer involved toggle button: In Filter, press Show Only transactions that you are no longer involved toggle button to switch from OFF to ON. Then press Apply
- Done!
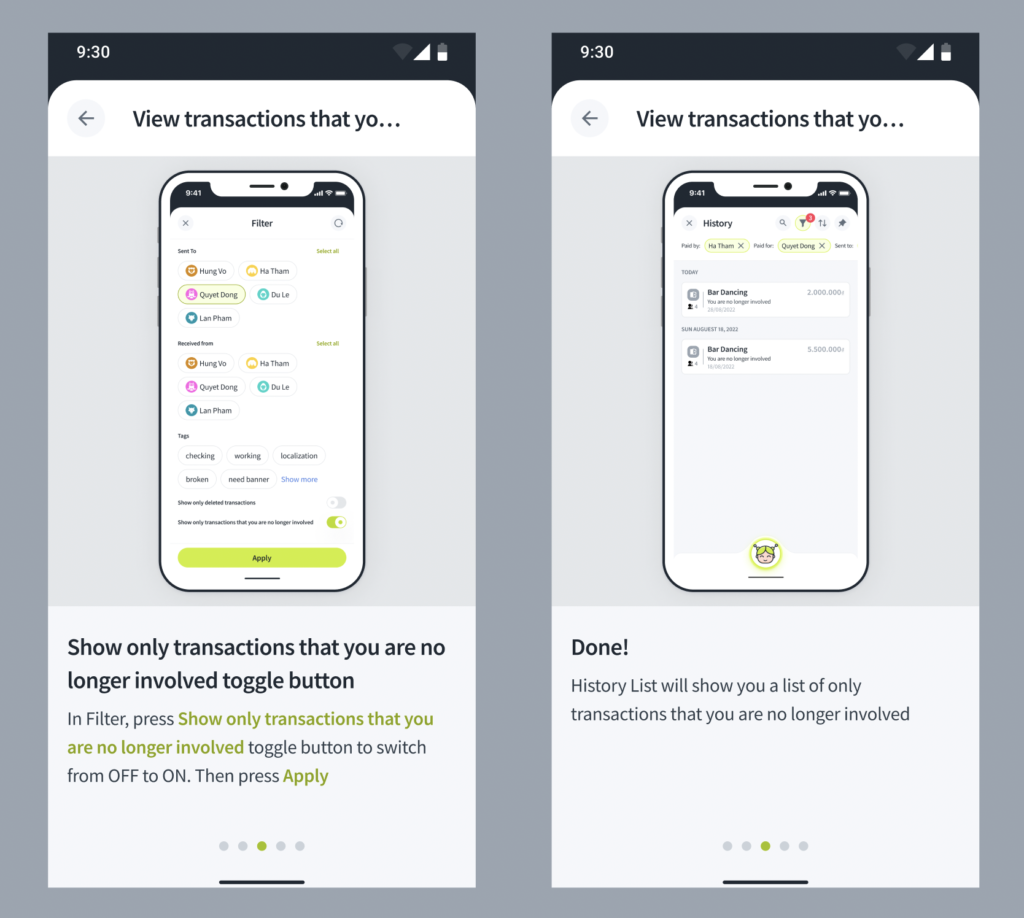
History List will show you a list of only transactions that you are no longer involved.
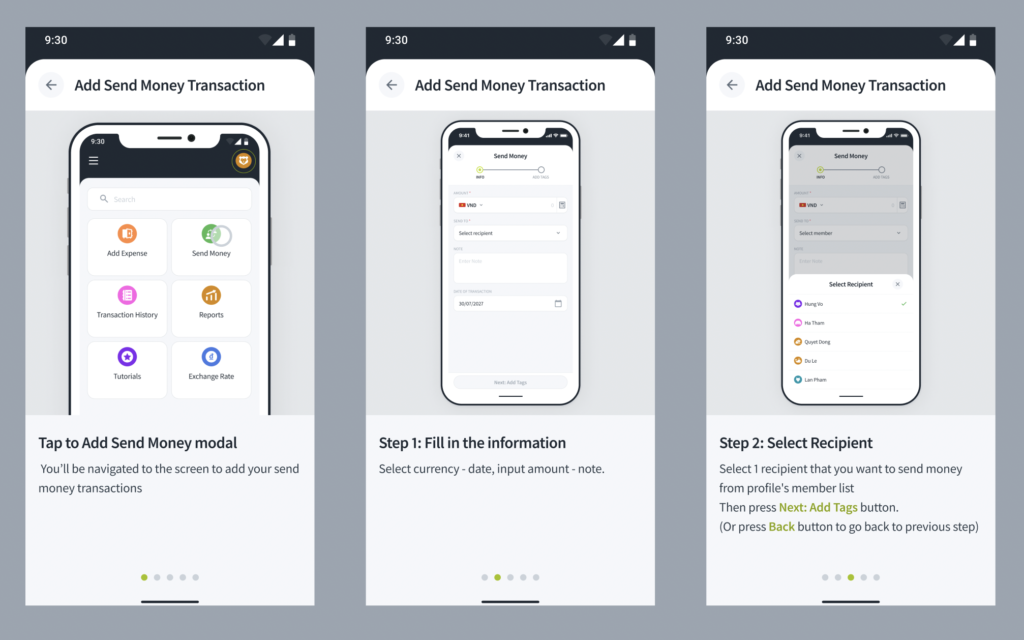
2. Add Send Money Transaction
Adding your Send Money Transaction when you sent money to other members
- Tap to Add Send Money modal: You’ll be navigated to the screen to add your send money transactions
- Step 1. Fill in the information: Select currency – date, input amount – note.
- Step 2. Select Recipient: Select 1 recipient that you want to send money from profile’s member list. Then press Next: Add Tags button. (Or press Back button to go back to previous step)
- Step 3. Add Tags: Select suggest tags or input tags you want to add.
- Press Done
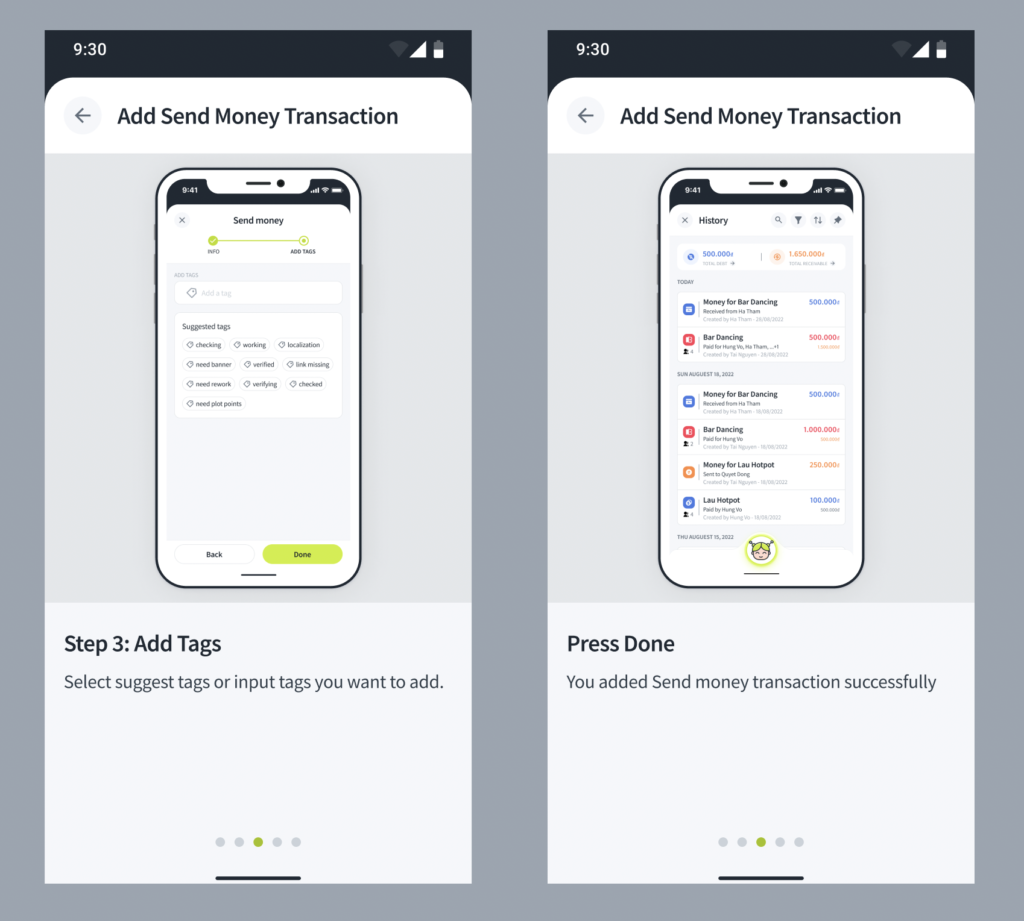
You added Send money transaction successfully
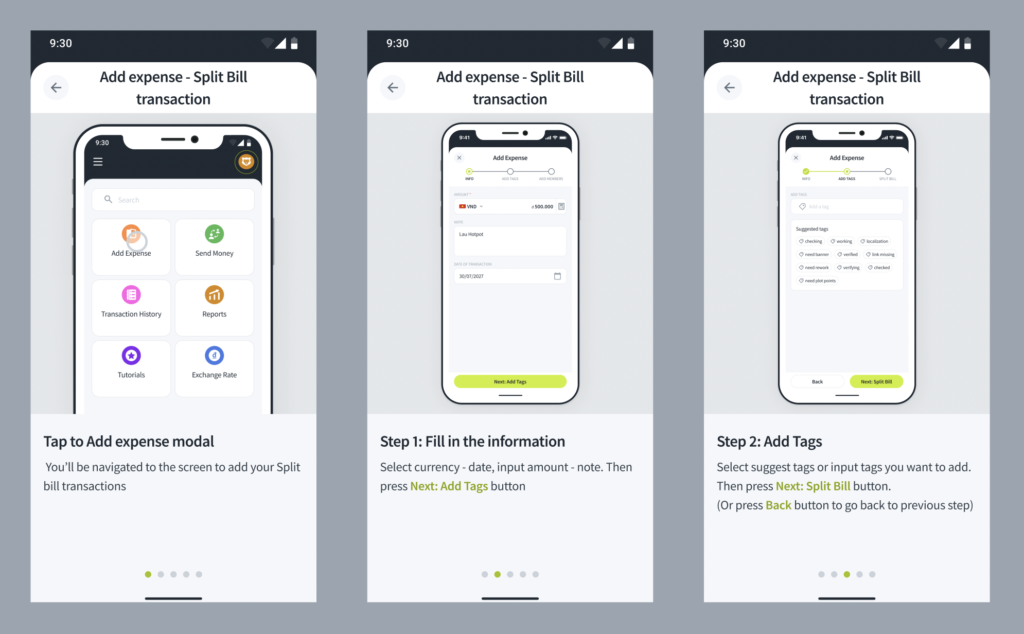
3. Add expense – Split Bill transaction
Adding your Split Bill transaction to be easy to share bill expense with Group member
- Tap to Add expense modal: You’ll be navigated to the screen to add your Split bill transactions
- Step 1. Fill in the information: Select currency – date, input amount – note. Then press Next: Add Tags button
- Step 2. Add Tags: Select suggest tags or input tags you want to add. Then press Next: Split Bill button. (Or press Back button to go back to previous step)
- Step 3: Split Bill: Tick/untick to select/unselect members that you want to split this bill for. Total amount will be auto split equally to selected member. Tap on amount box to edit amount of each member
- Press Done
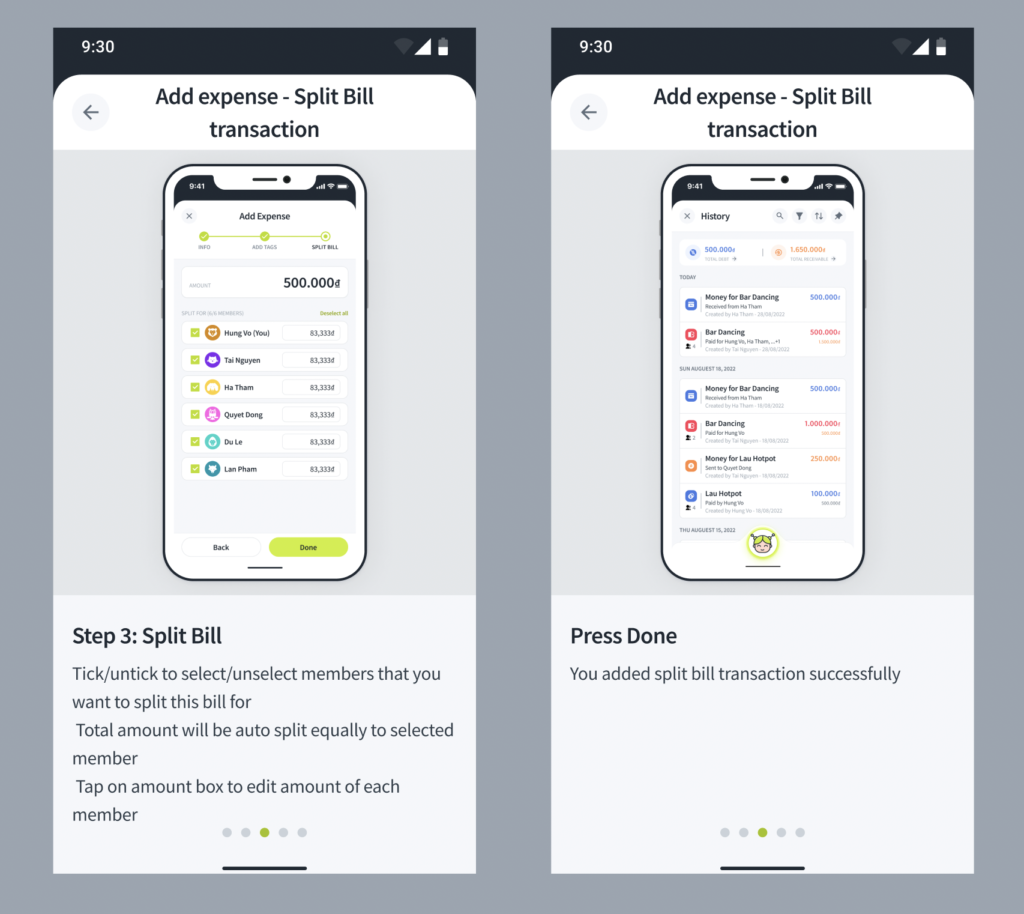
You added split bill transaction successfully
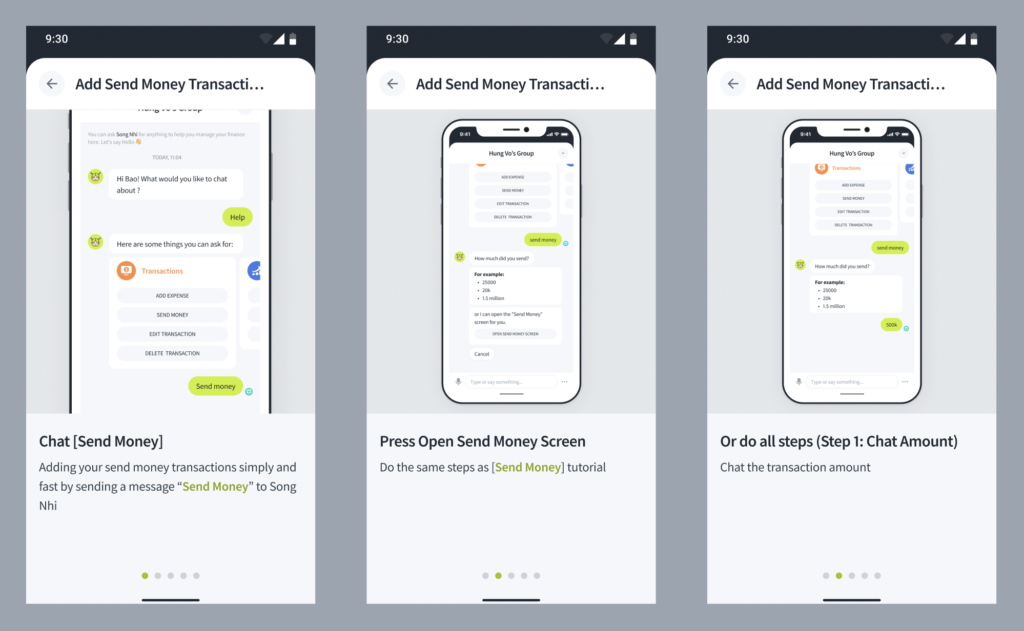
4. Add Send Money Transaction By Chat
Adding your Send Money Transaction when you sent money to other members
- Chat [Send Money]
- Adding your send money transactions simply and fastly by sending a message “Send Money” to Song Nhi
- Press Open Send Money Screen
- Do the same steps as [Send Money] tutorial
Or do all steps below:
- Step 1. Chat Amount: Chat the transaction amount
- Step 2. Select Recipient: Select the member that you want to send money to.
- Press Select Recipient button (Or press Cancel to cancel the process)
- Press Done

You added send money transaction successfully
5. Add Split Bill Transaction By Chat
Adding your Split Bill Transaction to be easy to share bill expense with Group member
- Chat [Add Expense]
- Adding your split bill transactions simply and fastly by sending a message “Add Expense” to SN
- Press Open Add Expense
- Do the same steps as [Add Expense] tutorial of Group profile
Or do all steps below:
- Step 1. Send [Transaction description + Amount]
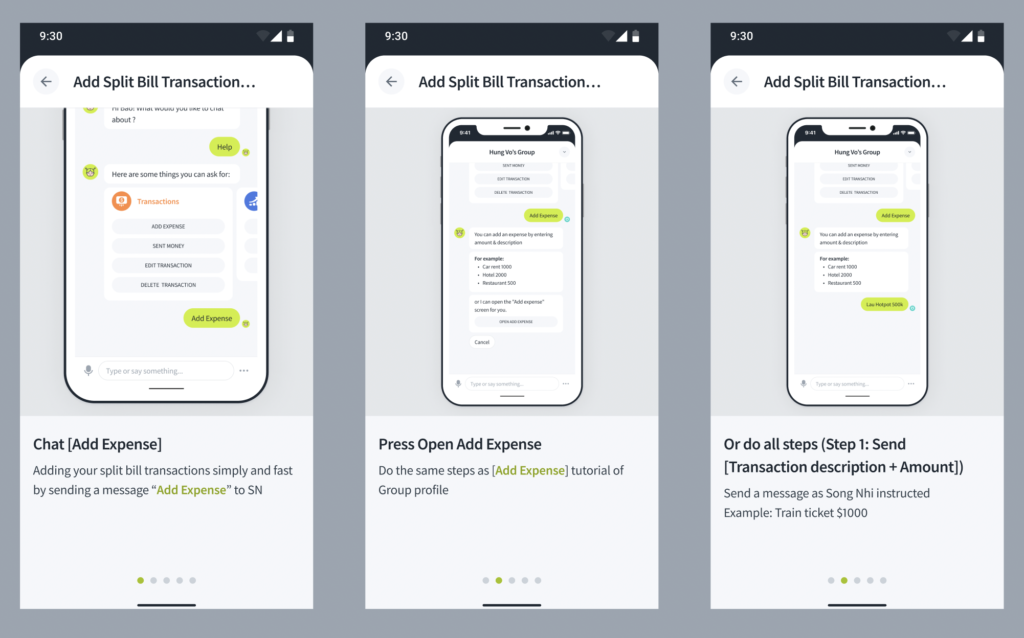
- Send a message as Song Nhi instructed. Example: Train ticket $1000
- Step 2. Select Member: Select the member that you want to split this bill for. Total amount will be auto split equally to selected member. Tap on amount box to edit amount of each member
- Press Split Bill button. (Or press Cancel to cancel the process)
- Press Done
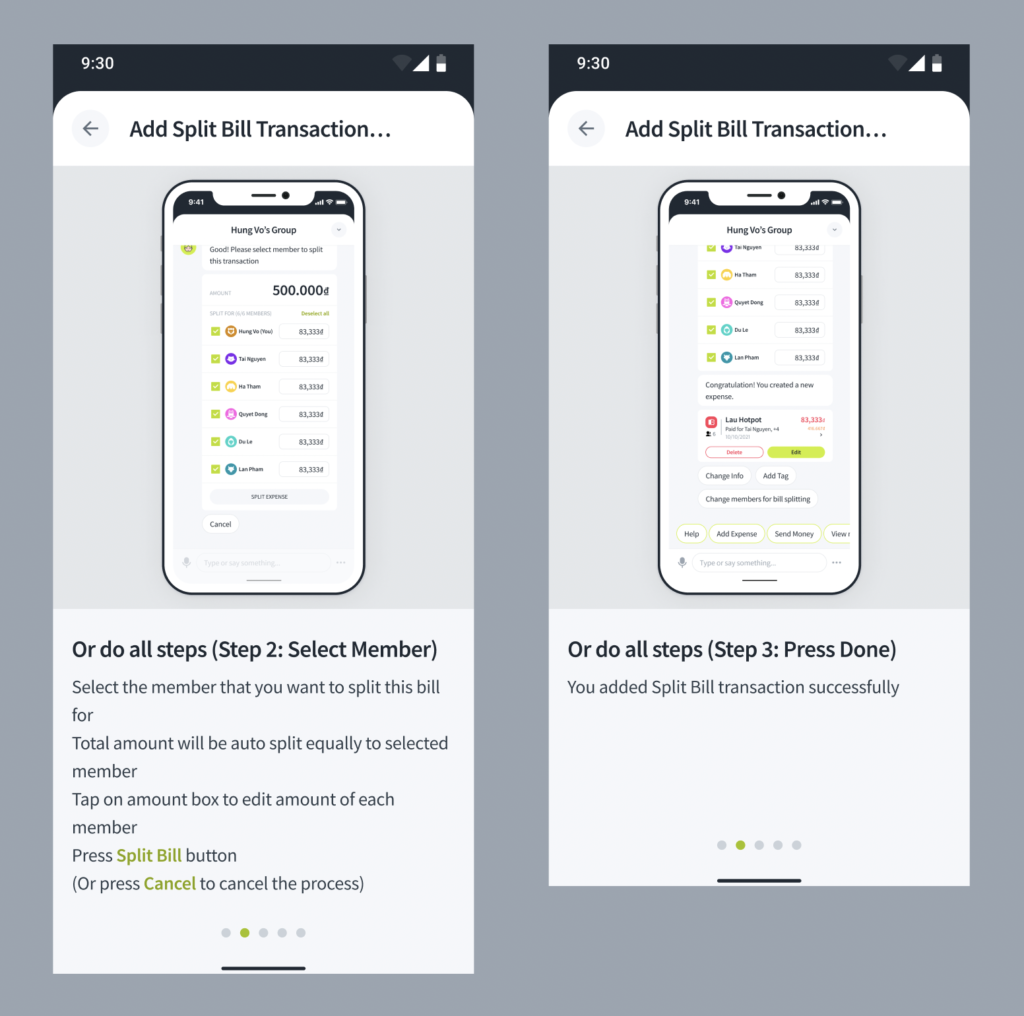
You added Split Bill transaction successfully